Showing posts with label Oracle Workflow. Show all posts

Wednesday, January 13, 2016

Configuration steps to start the Workflow Notification mailer in Test environments

Introduction

At times, there is a need to receive the notification emails that are sent through the Oracle workflow mailer in Development and Test environments. However, these emails should not go to the mailboxes of the users of the system. Instead, they should be redirected to a common mailbox. This blog article is a step by step guide to configure the workflow mailer for the above objective.

Important Note: These steps should NEVER be performed in the production environment.

Steps

Part 1 - Configure the mail server and email sender

1)      Login using ‘SYSADMIN user and go to responsibility  ‘Workflow Administrator Web Application’ > Workflow Manager


2)     You will see Notification mailer is Down


3) Click on ‘Down’.You will find the below window.


4) To Configure Workflow Mailer, press on Edit button


5) You will find the below window


6) Set the Server Name to your Email /SMTP server. Set the ‘Reply-To-Address’ to ‘NoReplyTo@AtYourCompany.com’.


7) Click on button 'Advanced'


8) Press 'Next'


9) Press 'Next'


10) Press 'Next'


11)   Update from field to ‘Workflow Mailer <Name of the Test Environment>’ for e.g. “Workflow Mailer DEV”


Part 2 - Configure the override address

Override address is the address where all the emails will redirected. This can be configured from front end also. However following are the steps to set it up from back end.

1)      Run the below sql statement

    select fscpv.parameter_value
      from fnd_svc_comp_params_tl fscpt
          ,fnd_svc_comp_param_vals fscpv
     where fscpt.display_name = 'Test Address' 
                     and fscpt.parameter_id = fscpv.parameter_id;

2) The result should be ‘NONE’


3) Now run the below sql update statement and commit

UPDATE fnd_svc_comp_param_vals fscpv 
  SET fscpv.PARAMETER_VALUE = 'redirectaddress@yourcompany.com' --( put the email address to which all emails will be redirected)
WHERE fscpv.parameter_id 
(SELECT fscpt.parameter_id
  FROM fnd_svc_comp_params_tl fscpt
 WHERE fscpt.display_name = 'Test Address');


4) Now run the SQL in Step 1 to verify that the email address has been set as required.

5) Now start the workflow mailer by going to ‘Workflow Administrator Web Application’ > Workflow Manager.   You will see Notification mailer is Down. Click on 'Down'. On next page '1)      Select ‘Start’ from drop down list and Press on Go button.


6) After the above step the workflow notification mailer should start and the status should be 'Running'.

Part 3 - Test the setup

1) Click on 'Workflow Notification Mailer'.


2)  Click on ‘Test Mailer’


3) Select a valid user for which email address has been setup and click 'Accept' button.

Two test emails should be sent to the email address that you have setup in the Part 2 (step 3). The emails should not be sent to the actual email address that is set for the user that you have selected.

This completes the steps needed to redirect emails on your test or development environment. Enjoy!!

Thursday, January 22, 2015

Oracle Workflow Training Topics

Following is the list of topics that should be covered in Oracle Workflow Training. The topics are exhaustive and have been divided to fit into two days (approx 7-8hrs per day). 

Day 1

• Talk about business process – P2P,  O2C
• Why a workflow helps in streamlining a business process.
• BPEL, workflow of future
• Workflow Server and Workflow Builder. How the development works. WFT file is created, when stored in database the definition goes to tables, specifically WF_ITEM_TYPES.
• WF_ENGINE is made up of PL/SQL packages.
• Case Study – Vacation approval system.
• Attributes, Message / Notification, Performers, Function, Process, Events.
• Overview of Workflow Builder. WFSTD and WFERROR processes.
• Bottom Up approach and Top down approach.
• Add WFSTD and WFERROR item to the new workflow that you define.
• Research on “Preferences SSWA” responsibility and the functionalities that it provides.
• Various functions available in the “Workflow Administrator” responsibility.
• Use “Developer Studio” function to run the workflow that you have developed. It should show the “Run” column.
• Link between WF_USER and FND_USER. Tables WF_USERS, WF_ROLES and WF_USER_ROLES.
• Notifications can be sent through email or to the worklist.


Day 2

• Hands-on – Continue working on modifying the Vacation approval example. Add a timeout activity. Add a Loop counter. Add a update function to update table.
• Workflow background process. Different parameters passed to this programs.
• Deferred activities.
• URL attribute, Form Attribute.
• Workflow Roles
• Send and Respond attributes.
• Calling one process from another. Parent and Child process.
• Business Event system – When workflow wants to communicate with external systems. 


Also on this site Core Java Training topics
http://tenthsense.blogspot.in/2013/02/core-java-course-contents.html

Drop a comment if you have any workflow training requirement


Tuesday, December 23, 2014

How to assign Oracle Workflow Administrator privileges to users

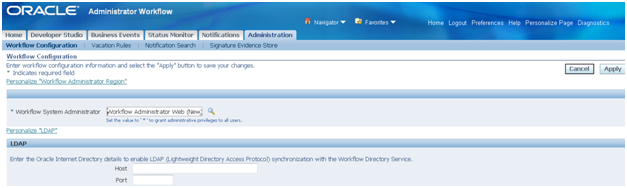
The workflow administrator privilege can be assigned to a particular user, responsibility or to everyone. The setup is done using the Administration function. Navigate to ‘Workflow Administrator (Responsibility) => Administrator Workflow (Menu) => Administration (Function).

In the field ‘Workflow System Administrator’ set the value to which you want to assign the workflow administrator privilege.

· To make ‘SYSADMIN’ user the workflow system administrator set the value as ‘SYSADMIN’


· To make all users workflow system administrators set the value as ‘*’.


·        To make all users having a particular responsibility as workflow system administrators choose the responsibility using the torch button. Generally, the responsibility ‘Workflow Administrator Web (New)’ is chosen for this purpose.


Thursday, August 14, 2014

How to enable Workflow ‘Notifications Search’ in Oracle Apps R12

How to enable ‘Notifications Search’ in Oracle Apps R12
The workflow notifications search functionality is not enabled by default in R12. You need to assign the corresponding search function as described below.
Step 1
Identify the menu attached to the responsibility in which you want to provide the notification search functionality.
Make an entry in the menu with prompt ‘Notifications Search’ and function ‘Workflow Notification Search’


Step 2
Assign the role ‘WF_ADMIN_ROLE’ either individually to the users or to the responsibility. This can be using the ‘Users Management’ responsibility. Search for the User to which you want to assign the role and then click the ‘Update’ icon.


Step 3
On the next page, click ‘Assign Roles’ and assign the role ‘Workflow Admin Role’ to the user.

           
Step 4
Now when the user logs in to applications, the Notification Search will be visible.


Wednesday, March 19, 2014

How to grant Oracle Workflow Roles to FND Users

There are two possible ways

If the Workflow Role is a EBS responsibility, you can simply assign the responsibility to the FND User. (i.e. this can be achieved using the application forms).

If the Workflow Roles is not a EBS responsibility, i.e. it has been created as an ad-hoc role using the WF_DIRECTORY.CreateAdHocRole API then you need to assign the role to user also using the WF_DIRECTORY.AddUsersToAdHocRole API.  (There is no way to achieve this using application forms, it can be done only using API).

Friday, December 20, 2013

How to identify the Activity ID for a Oracle Workflow Activity


Sometimes, we have to run the function attached to a workflow activity to see how it had worked for a particular run of a workflow. The standard definition of workflow functions has four input parameters viz. Item Type, Item Key, Function Mode and Activity ID. The Item Type and Item Key can easily be found on the workflow status monitor page. The Function Mode is normally RUN. Getting the value for Activity ID can be tricky. This is how the activity ID can be found in two different scenarios.

2.   Scenario – The workflow activity has encountered error.

          In this case you can get the activity by going to the Workflow Status Monitor -> Activity           History Table -> Click on the Error link on Status column. The error details page will give             you the Activity ID as shown below:


3.   Scenario – The workflow activity has completed successfully.
In this case the Activity ID is not available anywhere on the workflow status monitor page. So in this case the following query should be ran to get the Activity ID.
This query takes the ‘Activity Internal Name’,’ Item Type’ and ‘Item Key’ as input. The Activity ID is the INSTANCE_ID as available in the table WF_PROCESS_ACTIVITIES.

        SELECT WI.ITEM_TYPE
              ,WI.ITEM_KEY
              ,WI.BEGIN_DATE
              ,WPA.INSTANCE_ID ACTIVITY_ID
              ,WPA.ACTIVITY_NAME ACTIVITY_NAME
              ,WPA.PROCESS_NAME
          FROM APPS.WF_ITEMS WI
              ,APPS.WF_ITEM_ACTIVITY_STATUSES WIAS
              ,APPS.WF_PROCESS_ACTIVITIES WPA
         WHERE WI.ITEM_TYPE = WIAS.ITEM_TYPE
           AND WIAS.ITEM_TYPE = WPA.PROCESS_ITEM_TYPE
           AND WI.ITEM_KEY = WIAS.ITEM_KEY
           AND WIAS.PROCESS_ACTIVITY = WPA.INSTANCE_ID
           AND WPA.ACTIVITY_NAME = UPPER('&Activity_Name')
           AND WI.ITEM_TYPE = UPPER('&Workflow_Item_Type')
           AND WIAS.ITEM_KEY = UPPER('&Workflow_Item_Key')


This query may return multiple rows in case the activity is used multiple times within a process. In such a case, you should can identify the Activity ID based on the number of times the activity has occurred within the process. 
(Hint: The Activity ID is a numeric value which keeps on increasing in value)

Thursday, December 5, 2013

Identification and Removal of Unused Custom Functionality in Oracle EBS - Part 1


Good systems are not built they grow! They grow over time with addition of new functionality and features. At the same time many functionalities and features in a system lose their relevance over time and are no longer used. The software components behind these unused features manifest themselves as “technical debt” within the system.

For financial debts the hidden cost is called “interest”. For technical debt, interest takes the form of increased maintenance costs due to impact on system performance, tests, documentation etc. If one repays the financial debt, the interest costs reduce. Similarly by removing the technical debt the maintenance costs reduce and system performance improves!


This document discusses how technical debt within an Oracle EBS based system can be removed. 


At a high level the approach is to identify unused components, verify that they are indeed not used by performing dependency analysis and finally perform steps to remove the components.

Separate sections in the document list the details of the above approach for different Oracle EBS components such as Workflows, Forms, Reports, PL/SQL Code Objects (Packages, Procedures and Functions), Views and Tables. To implicitly avoid dependency related issues we start by removing the application components (Workflows, Forms and Reports) followed by code objects (PL/SQL Code Objects and Views) and finally the data objects (Tables).

The document does not describe approaches to remove applications components built using Oracle Application Framework (OAF), Discoverer and XML/BI Publisher. We believe that the reader can devise the approach for removing these components using similar principles described for other components in this document.


The first and foremost step to identify unused components is to talk to different stakeholders of the system such as system owners, architects, developers and system support team to get a list of unused functionality and features. The software components behind the identified functionality and features can then be identified. Members of the application development and support team may also be able to provide you with the list of unused software components.

This activity will provide the first working list of unused software components. This list is then further refined based on individual identification strategies described in following sections.


The initial list of unused workflows can be identified based on the strategy discussed in Identification section above.

Additionally, unused workflows can be identified by checking the latest time when each workflow item and the processes within it were ran. Workflow item types and corresponding processes which were ran long back are probably not in use any more and are likely candidates for removal.

Note: This query might not give correct usage picture as normally the workflow runtime data is frequently purged.

  SELECT wpa.process_item_type, wpa.process_name,
         MAX (wias.begin_date) latest_run_time
    FROM wf_process_activities wpa,
         wf_item_activity_statuses wias
   WHERE wpa.instance_id = wias.process_activity (+)
     AND wpa.process_item_type LIKE 'XX%'
     AND wpa.process_name <> 'ROOT'
GROUP BY wpa.process_item_type, wpa.process_name
ORDER BY wpa.process_item_type, wpa.process_name

The identified workflows can then be verified by checking if the workflow is being referred in any program.

SELECT *
  FROM all_source
 WHERE UPPER (text) LIKE UPPER('%<ITEM_TYPE_NAME>%')


Workflow data is of two types, design time and run time. The Design time data is the actual workflow definition, initially created as WFT file and uploaded to workflow design time tables in the database. Every execution of the workflow process also generates data which is stored in the workflow runtime tables.

Even if a workflow is no longer being used, the workflow runtime data of the past executions might be required to comply with statutory requirements or customer needs. Removal of the workflow is therefore not a straightforward decision. Careful consideration is therefore required to determine whether it is okay to remove the workflow runtime data or both (runtime and design time). 
Note: It is not possible to remove only design time data.

To remove workflow runtime data a seeded concurrent program “Purge Obsolete Workflow Runtime Data” is available. This program takes ‘Item Type’ as a parameter. Another important parameter is ‘Age’; this is the minimum age of data to purge in days.

To remove both, workflow design time and runtime data, a seeded script “Wfrmitt.sql” has been provided by Oracle. The script is available in $FND_TOP/sql folder, the same can be copied to a suitable working folder. Run the following command to execute the script, the script then asks for item name that needs to be removed.

sqlplus  <user/pwd> @wfrmitt

Sunday, April 7, 2013

How to use Business Events in Oracle Workflow


Business Events in Workflow

Following is a simple step by step guide to use Business Events feature of Oracle Workflow in Oracle Applications (E-Business Suite).

Step 1) Navigate to the workflow administrator responsibility and choose the Business Events function. Define a Business Event.Owner name should be application name and owner tag should be the application short name.


Step 2) Define a Subscription for the Business Event defined in Step 1

  1.  System => should be the name of the database where the workflow is installed
  2. Phase => Keep the value for phase as 99 if you want the workflow to run immediately.
  3. Event Filter => Name of the event


Step 3) In workflow builder create a workflow item type and define 3 attributes as follows


Step 4) Create a event as follows


Step 5) Create a process as follows

Note: The starting node should be the Event that we have created


Associate the attributes that were created with the Event in the process.


Step 6) Test the event


Click “Raise in PLSQL”.


Now check if the workflow has been triggered in the Status Monitor


Thursday, June 21, 2012

Handle Exceptions in Oracle Workflow

While working with Oracle workflow, one frequent requirement is to handle errors in Functions that are used by workflow Activity. There are two ways to handle this requirement.


Approach 1 – Do Nothing


Yes, you read it correctly, in the function just write your code without doing anything special to capture the exception i.e. do not put any exception block. Workflow will automatically capture the exception and display appropriate error code and error message against the activity where the error was encountered in Activity History.


Approach 2 – Use WF_CORE API’s


Add an exception block in your code and call WF_CORE.CONTEXT API, the syntax for which is as follows. The first two parameters for this functions are the package name and the procedure name, from third parameter onwards you can pass any argument. This can be used to set any values which are specific to the procedure and which can help in debugging.


procedure CONTEXT (pkg_name  IN VARCHAR2,
                   proc_name IN VARCHAR2,
                   arg1      IN VARCHAR2 DEFAULT '*none*',
                   arg2      IN VARCHAR2 DEFAULT '*none*',
                   arg3      IN VARCHAR2 DEFAULT '*none*',
                   arg4      IN VARCHAR2 DEFAULT '*none*',
                   arg5      IN VARCHAR2 DEFAULT '*none*');


For example the call can be as follows.


BEGIN
 ...
EXCEPTION

  WHEN OTHERS THEN
             wf_core.CONTEXT (pkg_name    => 'XXARM_ADDRESS',
                              proc_name   => 'ADDRESS_AR_OUTGOING_PROCESS',
                              arg1        => pv_itemtype,
                              arg2        => pv_itemkey,
                              arg3        => pn_actid,
                              arg4        => pv_funcmode,
                              arg5        => ‘ERROR :'|| SQLCODE || ‘ ‘ || SUBSTR(SQLERRM,1,300));
    RAISE;

END;


In the above call an interesting point to note is the arguments passed in fields from arg1 to arg4. If you note these are the values which the workflow passes to the function, so now you have the same values and it is very easy to debug the function. In arg5 we can capture the SQL error that was encountered.


If the control goes in the exception block as defined, an entry is added to the error stack to provide context information that helps locate the source of an error. In the workflow monitor you can view the details of the above error  by navigating to ‘Activity History’ and clicking on the ‘Error’ link in the Status column on the activity which has got error.